
.png)
Brief
To use the injection moulding method as the basis for a miniature product. Two injection moulding connections must be present on the item.
Ideation
An injection-moulded product was examined at home as the project's first step. I went with a makeup box because almost all of them are injected and moulded for mass production. Mould is difficult and very expensive; an injection mould may cost up to $40,000. It was time to start generating ideas after thoroughly understanding the fundamentals of the injection moulding procedure and looking over the cosmetics box.
I considered various box designs and their intended uses. Since form follows function, I had to decide what kind of product it would be. I chose the palette because I thought it would be interesting to have a mirror and a container section for the palette for design possibilities.
Prototyping
I choose three ideas from my Ideation and created prototypes for each. Because I only had a few tools and materials available because of the COVID lockdowns, I chose cardboard because it was more durable and hygienic. The prototypes were put through user testing at home as functional items. The hinge, the rounded sides, and the number of palettes it could contain distinguished two very similar conceptions. In retrospect, I think there should have been just one concept development rather than two. Based on a wedding ring box, they exist. The first idea was a wallet that could be carried in the rear pocket for easy access. I chose concept 2 because I liked the dual palette sider and the simple, almost an Apple 'air-pod' box look.


Concept 1


Concept 2

Concept 3
Concept Development

The makeup box needed to be "manufactured" at this point; it had to go through a few redesign stages so the package could be moulded. I had to determine the final layout, how it would be used, and what components were created.
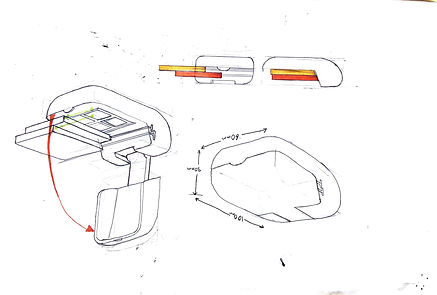
I considered the various ways the box might be opened and the way the palettes within might be displayed. Since the box is a compact object that fits comfortably in the hand, its size was also taken into consideration. The most ergonomically way to hold it is, in one hand and open it with the thumb, like you would a flip phone. I kept it as straightforward and minimal as I could to lessen the complexity of injection moulding. I considered using hinges to connect the inter-palettes, but the constant movement would have been bothersome and messy. The movable palette was chosen as it can pull out completely, allowing the individual palettes to be changed out and replaced as they get worn. To enable the palettes to be switched out, I created a separate object for the base palette that fits comfortably in the bottom case.
After that, I looked at the design and shape of the box, as this would indicate how the product's story would be told. I liked how the box's basic, rounded corners made it look like a box for a wedding ring. Open it up to reveal the lovely diamond, which is the user's reflection in the tiny mirror.
SolidWorks
Making a 3D computer model of the concept, with the exact measurements and features from the concept development, was the project's last step. SolidWorks was introduced to us in our college as it is widely utilized in the engineering industry worldwide. I recreated the product in Solidworks with the aid of the 1:1 scale prototype and idea designs. I then produced renders in Solidworks using the Photo 360 program.
Poster
I made the decision to return to the project a year later to hone my Adobe software and KeyShot skills. I used Illustrator and Photoshop to create a poster to promote the Makeup Palette.
Renders
To produce high-quality renders, I used Keyshot, and I also wanted to experiment with the features and materials under various lighting conditions.


