.png)
Brief
Ideation

.png)
.png)
.png)

Ideation
This was one of my favourite projects in college. The fact that we were solely responsible for designing, prototyping, and gathering supplies and materials for the project provided us our first sense of creative freedom and independence. The bulb itself and the designer were the two restrictions we were given. I was given a tube light, so I ordered a warm, soft glow bulb from Amazon. Naoto Fukasawa, a well-known Japanese designer who is among the best in the world, created my design. His creations were warm, tidy, rounded, and smooth. I developed my ideas based on these. The ideation was interesting because of the length of the bulb. I had a lot of original ideas as well as some less original ones.
"Form follows function" dictates that a specific type of bulb be used to provide light. Whether the light is ambient, task, or accent depends on the bulb show. The resources are obtained by the pupils themselves.
The student will also be given a famous designer to study and inspire their designer for the light

Concept Development
I ended up with a light that was more like a Jenga tower with the bulb within than entirely exposed. I made the decision to use an ambient lamp to lend a pleasant glow to the space while gently illuminating it. IKEA had the ideal light bulb for me. While exploring the UL architectural studio with my friend, I stumbled upon the idea. I saw a sunshade idea and changed it to work for a lamp. I loved how it partially obscured the sun while allowing the light to bounce and cast a gentle glow in the main regions.
Prototyping
To evaluate the light's functionality and appearance, I made two prototypes. The Jenja building diffused a gentle radiance as though it were thinking. To make it more rounded and add to the lamp's distinctiveness, I transformed it into a hyperbolic shape. The symmetry is aesthetically attractive. Making the cross section taller and reducing the amount since the model blocked a lot of light were notes I made for future improvement.


Final Concept
I reduced the number of layers while increasing layer size. Since we didn't have enough time to create a second prototype, I lay out all the dimensions. The materials that would be used needed to be organized. I chose balsa wood because it is simple to cut and shade, and because of how easily the light would be dispersed by its light color and gentle texture.


Final Model
The final model took me three days to construct because I had to mark out each piece separately from the 2 m × 0.2 m balsa sheet. The samples were bandsaw-cut, then superglued together. In order to create a gorgeous inside lampshade, I hot-glued a paper sheet within the cavity where the bulb would reside. The lamp is positioned onto, the bulb is pushed into, and the bulb is placed on a seat holder.


3D Print
After finishing my lamp project that summer, I worked as a summer intern at Boston Scientific. When the business acquired a new printer, I displayed my design for printing to demonstrate the machine's potential. After that, I went to Solidworks to replicate my project so I could export it for printing. The printer could not handle such a large print, so the item had to be divided in half. However, the work was published at the conclusion of the summer. The lamp was printed over the course of 27 hours and is constructed of ABS plastic.
Renders


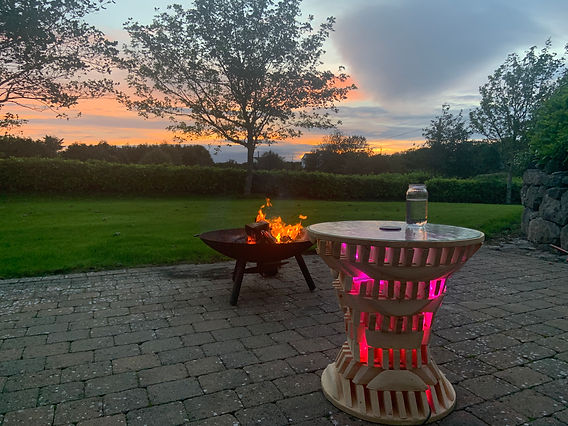
HYPE TABLE
Concept Development
I went back to my lamp design after the Covid lockdowns and realized it might be more. I recognized my chance to recycle a piece of glass that had been part of an old coffee table as it was ready to be discarded. I started working on developing various sizes and radii.

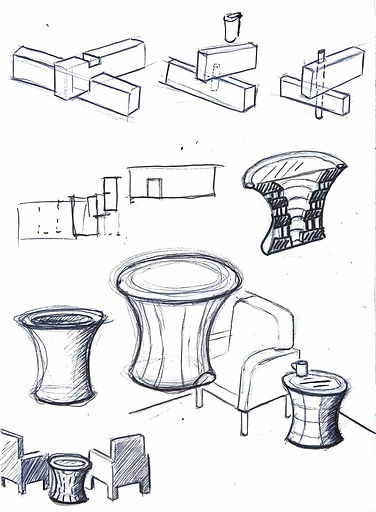

Model Making
I received cardboard I started to build cardboard rings that displayed the diameter and thickness of each connecting or intersecting layer after drawing out the dimensions I learned from my development. I determined the longest possible lengths for each item and added them. I was curious how many good wood boards I would require for this project. I traced out the portions on the board using those precise measurements, then I used a buzz saw to cut them out. Each wooden piece's side was carefully and painstakingly carved until I had a smooth curve around the hyperbolic shape. Up until all the details were made, the table had to be continually rebuilt. Since I didn't think there would be any joints needed to hold the table together, I used wood glue to glue them together. To make sure the wood was protected from the elements, I varnished it.
I chose an LED strip light and wove it in between the joints because, like the lamp, I like the concept of light emanating from within. It produced an interior flame when an orange was ignited nearby.
From the first drawing to the LED lights, the entire construction process took one week. I'm pleased with the outcomes. I think it is worth the HYPE!!